Google身份验证器Google Authenticator是谷歌推出的基于时间的一次性密码(Time-based One-time Password,简称TOTP),只需要在手机上安装该APP,就可以生成一个随着时间变化的一次性密码,用于帐户验证。
相对于手机短信两步验证(Two-step verification),Google Authenticator两步验证有两大好处:一是避免无法接收验证短信的痛苦,尤其是用国内手机接收国外短信,你会发现经常收不到;二是Google Authenticator不用联网也可用,手机欠费停机不影响。
国外各大网站和应用都基本上支持Google Authenticator两步验证了,而国内的阿里云、七牛CDN等实际上也可使用Google身份验证器的两步验证。安装和使用Google Authenticator都非常简单,你只要保证手机不丢失就可以提升网站账号的安全性了。
本篇文章就来分享一下Google身份验证器下载和使用方法,同时我们可以在Wordpress和VPS主机SSH登录过程中使用Google Authenticator同步验证,增加网站安全性。更多的有关于网站数据安全与恢复的经验,可以参考:
- 1、WP安全:WordPress防暴力破解:安全插件和用.htpasswd保护WordPress控制面板
- 2、VPS安全:增强VPS 账号安全:改端口,禁用Root,密钥登录,Denyhosts防暴力攻击
- 3、域名安全:增强域名注册账户和DNS管理账户安全-防止域名被盗和域名恶意解析
Google身份验证器使用-Wordpress和VPS利用Google Authenticator两步验证
1、Google Authenticator官网:
- 1、APP主页:Google Play Google Authenticator
- 2、备用下载:Google Authenticator 下载 和 条码扫描器下载。
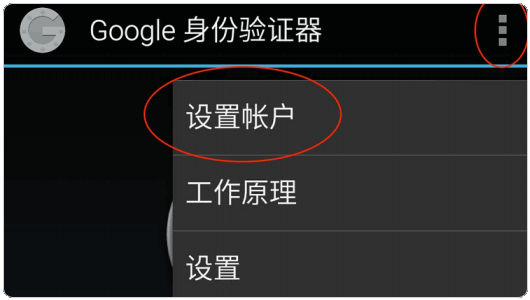
2、Google Authenticator根据时间信息来生成密钥,请确保您手机上时间信息准确。在手机上安装Google身份验证器后,你可以添加账户了。
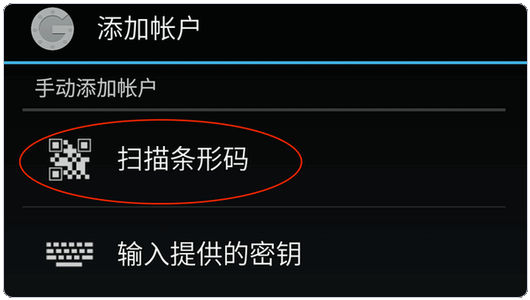
3、一般来说,我们可以选择“扫描条形码”,然后会弹出条形码扫描窗口,扫描MFA绑定页上生成的二维码即可。
1、Gmail。Google Authenticator应用的地方非常广泛,首当其冲的就是Gmail了,之前部落分享过Gmail设置两步验证手机动态密码,现在我们可以改成使用Google身份验证器了。
2、直接扫描Gmail账户设置中二维码,添加账号。
3、再次登录Gmail时,我们就可以使用Google身份验证器Google Authenticator验证码了。
4、Name.com。Name.com注册或续费域名可以获得免费Whois隐私保护,部落的好多域名都放在Name.com里,现在Name.com也支持Google Authenticator同步验证了。
5、在Name.com账户设置中开启“两步验证”,然后就是扫描Name.com生成的二维码了。
6、绑定成功了Google Authenticator后,一定要记得保存好备用码。

7、Aliyun。阿里云服务器ECS的账号管理系统也支持使用Google Authenticator登录。
8、你需要在MFA页输入连续的两组MFA Code,然后点击“确认启用”来完成绑定。
9、Linode。Linode VPS口碑不错,用户众多,但是它的账户系统却并安全,印象当中至少有两次用户数据被泄露。现在你可以在Linode中开启两步验证了。
10、直接进入到Linode的账户安全与隐私设置中,扫描生成的二维码即可。
1、一旦你的众多账号开始依赖Google Authenticator登录的话,建议你至少保存好当时绑定Google Authenticator二维码图片还有备用码,这样当Google Authenticator丢失后可以重新绑定恢复。
2、一般来说,网站账号支持Google Authenticator两步验证的话,都会提供手机短信、邮箱和人工客服等其它方式验证账号登录。但是,我们可以提前给Google Authenticator进行备份,以便随时恢复。

3、利用ADB(Android Debug Bridge) 备份Google Authenticator。命令如下(注意:AFolderOnPC是PC上真实存在文件夹):
1 2 3 4 5 |
Linux: adb pull /data/data/com.google.android.apps.authenticator2/databases/databases /AFolderOnPC Windows: adb pull /data/data/com.google.android.apps.authenticator2/databases/databases C:\AFolderOnPC |
4、当你更换了新的手机后,你可以安装Google Authenticator,然后将备份出来的数据复制覆盖到原来路径中。复制过程中注意保持databases 文件夹 和 databases 文件读写权限是755 。命令:
1 |
adb push databases /data/data/com.google.android.apps.authenticator2/databases/databases |
5、利用FX file explorer备份Google Authenticator。在手机上安装FX file explorer,然后依次进入:根目录 > 进入"data" folder > 再进入 "data" folder >复制 com.google.android.apps.authenticator2 。将复制的文件保存在其它存储中。
6、利用手机整机备份功能实现备份恢复Google Authenticator。现在手机都提供了整机数据完整备份,我们可以定时生成一个手机数据镜像,等到换新手机时就可以直接恢复了。

四、利用Google Authenticator增强Wordpress安全
1、Wordpress支持Google Authenticator同步验证登录,实现的方法很简单,你只需要安装Wordpress Google Authenticator插件,参考:Google Authenticator登录验证。
2、安装好了Wordpress Google Authenticator插件后,你就可以在登录Wordpress时需要填写Google Authenticator验证码了。
五、用 Google Authenticator 加强 VPS主机安全
1、我们只需要在VPS主机安装Google Authenticator 模块即可,安装命令如下:
1 2 3 4 5 6 7 8 |
//Ubuntu直接安装 sudo apt-get install libpam-google-authenticator //或编译安装 sudo apt-get install apt-get install libpam0g-dev libqrencode3 #安装依赖包 git clone https://code.google.com/p/google-authenticator/ #下载源代码 cd google-authenticator/libpam/ make install #编译并安装 |
2、编辑SSH配置文件,在第一行添加pam_google_authenticator.so模块。修改ChallengeResponseAuthentication为Yes。
1 2 3 4 5 6 7 |
nano /etc/pam.d/sshd //添加 auth required pam_google_authenticator.so nano /etc/ssh/sshd_config //修改 ChallengeResponseAuthentication yes |

3、配置Google Authenticator 。执行命令:google-authenticator ,这时会生成一个二维码,还有几个备用码,你只需要用手机的Google Authenticator 客户端扫描绑定账号即可。

4、Google Authenticator 还会询问你几个问题:是否将配置写入目录的配置文件、是否禁止一个口令多用、是否打开时间容错以防止客户端与服务器时间相差太大导致认证失败等。
1 2 3 4 5 6 7 8 9 10 11 12 13 14 15 16 17 18 |
Do you want authentication tokens to be time-based (y/n) y Do you want me to update your "/root/.google_authenticator" file (y/n) y Do you want to disallow multiple uses of the same authentication token? This restricts you to one login about every 30s, but it increases your chances to notice or even prevent man-in-the-middle attacks (y/n) y By default, tokens are good for 30 seconds and in order to compensate for possible time-skew between the client and the server, we allow an extra token before and after the current time. If you experience problems with poor time synchronization, you can increase the window from its default size of 1:30min to about 4min. Do you want to do so (y/n) y If the computer that you are logging into isn't hardened against brute-force login attempts, you can enable rate-limiting for the authentication module. By default, this limits attackers to no more than 3 login attempts every 30s. Do you want to enable rate-limiting (y/n) y |
5、配置完成后,你就可以重启VPS或者重启SSH服务:/etc/init.d/ssh restart,再次登录VPS时你就会看到Verification code了。

1、Google身份验证器建议到Google Play市场上下载最新版本的,或者到国内正规的APP市场上搜索安装。Google Authenticator的备用码和绑定账号时生成的二维码一定要保存好,以备不时之需。
2、用Google Authenticator 增加VPS主机安全,操作前建议做好VPS主机备份,一旦无法登录SSH立即用原备份覆盖。另外,Google Authenticator 备份也很关键,一旦丢失,损失惨重。
本文出自:

文章评论